Checkpoints
Checkpoints automatically version your workspace files during Kilo Code tasks, enabling non-destructive exploration of AI suggestions and easy recovery from unwanted changes.
Checkpoints let you:
- Safely experiment with AI-suggested changes
- Easily recover from undesired modifications
- Compare different implementation approaches
- Revert to previous project states without losing work
Configuration Options
Checkpoints (called snapshots in the new extension) are enabled by default. They are configured via the snapshot key in your config file (kilo.jsonc or ~/.config/kilo/kilo.jsonc):
{
  "snapshot": true
}
You can also toggle this in Settings:
- Open Settings by clicking the gear icon
- Go to the Checkpoints tab
- Toggle the snapshot setting on or off
Unlike the legacy extension which used a separate shadow Git repository, the new extension uses a dedicated snapshot Git repository stored outside your project. Your project's .git history is never modified by the snapshot system.
How Checkpoints Work
The new extension uses git-based snapshots to track your workspace state. A dedicated Git repository (with a detached work tree pointing at your project) is created outside your project directory to store snapshot data — your project's own .git history is never touched.
Snapshots are captured automatically at the boundaries of each model call within an agent turn:
- Before the model starts generating (step start)
- After the model finishes and its tool calls have been executed (step finish)
A single user message can produce multiple steps. For example, if the agent edits a file, runs a command, sees the output, and then edits another file, each model call in that sequence gets its own snapshot pair. The system records which files changed in each step.
However, while snapshots are taken at each step boundary, the revert UI operates at the user message level. You can only revert to the point just before a user message was sent — you cannot revert to an intermediate step within a single agent response.
Revert granularity is per user message, not per individual step or file edit. If the agent makes changes across multiple steps within a single response, reverting will undo all of those changes at once.
Snapshots respect your .gitignore rules. Files ignored by Git (such as node_modules/, dist/, or .env) are excluded from snapshots.
Working with Checkpoints
Checkpoints are integrated directly into your chat interface. Each agent turn that modified files shows a collapsible diff summary listing the changed files with addition/deletion counts.
Viewing Changes
Click the diff summary on any agent turn to expand it and see which files were modified. Click an individual file to open a side-by-side diff in the VS Code editor.
Reverting with "Revert to here"
Every user message in the chat that has a corresponding agent response shows a Revert to here button (a left-arrow icon) when you hover over it:
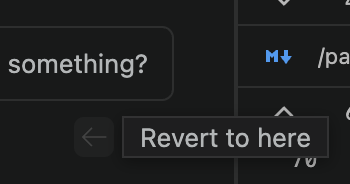
The revert button appears on user messages only — these are the revert points in the conversation. You revert to the state your workspace was in just before a given user message was sent. There is no way to revert to a point partway through an agent response.
Clicking Revert to here does two things:
- Restores your workspace files to the state they were in just before that message was sent
- Hides all subsequent messages in the chat so you see the conversation as it was at that point
The button is only active when the agent is idle. While the agent is running, the button is disabled to prevent reverting mid-operation.
The Revert Banner
After reverting, a Revert Banner appears at the bottom of the chat. The banner shows:
- The number of messages that were reverted (e.g. "1 message reverted" or "3 messages reverted")
- A per-file breakdown of the changes that were undone, with addition/deletion counts
- A hint: "Send a new message to make this permanent"
The banner provides two actions:
- Redo — Steps forward one message at a time, re-applying changes from the next reverted message
- Redo All — Restores the workspace to the latest state and un-hides all messages (only shown when more than one message is reverted)
Making a Revert Permanent
While in a reverted state, you have two choices:
- Redo / Redo All to return to where you were
- Send a new message to branch off from the reverted point. When you send a new message while reverted, the reverted messages are permanently deleted from the session and the agent continues from the restored state. This is how you "undo" the agent's work and try a different approach.
Reverting is non-destructive until you send a new message. You can freely revert and redo to compare different states of your code without losing anything.
Limitations and Considerations
- Scope: Checkpoints only capture changes made during active Kilo Code tasks
- External changes: Modifications made outside of tasks (manual edits, other tools) aren't included
- Large files: Very large binary files may impact performance
- Unsaved work: Restoration will overwrite any unsaved changes in your workspace
Technical Implementation
Snapshot Architecture
The snapshot system consists of:
Snapshot Git Repository: A dedicated Git repository created outside your project at
~/.local/share/kilo/snapshot/<project-id>/<worktree-hash>/. This stores all snapshot tree objects without affecting your project's Git history. Each worktree gets its own snapshot repository, identified by a hash of the worktree path.Step-level Snapshots: The agent runtime automatically runs
git write-treeagainst your workspace before and after each agent step. The resulting tree hashes are stored alongside the conversation messages.Patch Records: After each step, the system records which files were modified. These patch records enable targeted file-level reverts rather than full-workspace restores.
How Revert Works
When you click "Revert to here" on a message:
- The system collects all patch records (file change lists) from messages after the revert point
- A snapshot of the current workspace is taken so the operation can be undone
- For each changed file, the system checks out the version from the pre-change snapshot using the stored tree hash
- Files that were created by the agent (and didn't exist before) are deleted
- The session records the revert state so the UI can show the Revert Banner
When you click "Redo All" (unrevert):
- The workspace is fully restored from the snapshot taken in step 2 above using
git checkout-index - The revert state is cleared from the session
Storage and Cleanup
Snapshot data is stored per-project and is periodically cleaned up. A background process runs git gc --prune=7.days every hour, which removes unreachable snapshot objects older than 7 days. Because snapshots are stored as raw tree hashes (not refs or commits), older snapshots may be pruned by garbage collection even if a session still references them.
Worktree Isolation
When using the Agent Manager with git worktrees, each worktree gets its own isolated snapshot repository. This prevents snapshot data from one worktree interfering with another while sharing underlying Git objects for storage efficiency.
Git Installation
Checkpoints require Git to be installed on your system. If Git is unavailable or the workspace is not a Git repository, Kilo skips checkpoints automatically; you do not need to disable them manually.
macOS
Install with Homebrew (recommended):
brew install git
Alternative: Install with Xcode Command Line Tools:
xcode-select --install
Verify installation:
- Open Terminal
- Type
git --version - You should see a version number like
git version 2.40.0
Windows
Download Git for Windows:
- Visit https://git-scm.com/download/win
- The download should start automatically
Run the installer:
- Accept the license agreement
- Choose installation location (default is recommended)
- Select components (default options are typically sufficient)
- Choose the default editor
- Choose how to use Git from the command line (recommended: Git from the command line and also from 3rd-party software)
- Configure line ending conversions (recommended: Checkout Windows-style, commit Unix-style)
- Complete the installation
Verify installation:
- Open Command Prompt or PowerShell
- Type
git --version - You should see a version number like
git version 2.40.0.windows.1
Linux
Debian/Ubuntu:
sudo apt update
sudo apt install git
Fedora:
sudo dnf install git
Arch Linux:
sudo pacman -S git
Verify installation:
- Open Terminal
- Type
git --version - You should see a version number